BUZZ BOMBS/HELICOPTERS
| A very popular flying firework is the Buzz Bomb or Helicopter. Both are basically the same device, but the buzz bomb explodes with a loud report at the apex of its flight. There are a large number of variations to this particular firework, and we cover several in the procedures outlined below. |
GETTING STARTED
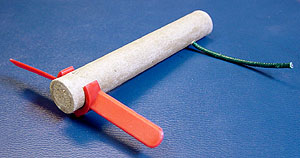
The helicopter is made from a 4 ounce rocket tube (1/2" ID x 5" long). Like all rocket-type devices, the tubes used must be parallel-wound to prevent bursting due to the high internal pressures generated. Parallel-wound tubes do not have the spiral seam that goes down the length of the tube (like the tube from a roll of paper towels or toilet paper).
Once you've got the proper tube, the first thing you'll need to do is make (or purchase) some tooling. The reason for the tooling is to be able to form a hard plug and cavity at the end of the tube.
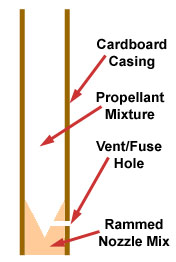
When lit, hot gasses, sparks and flame shoot out the small 1/8" vent hole at the bottom of the helicopter, making it spin and lift off the ground. If you were to make an exhaust hole in the cardboard casing alone, the intense heat and flame would widen the hole in a fraction of a second, reducing the thrust and making the helicopter just flop around on the ground.
What the tooling does is form a cavity of heat-resistant Rocket Nozzle Mix at the bottom of the tube. With the rocket nozzle mix cavity in place, the flame and hot gasses pass through the small vent hole in it, which they cannot burn through, so the hole stays at 1/8" all through the flight. See the illustrations below:
 | 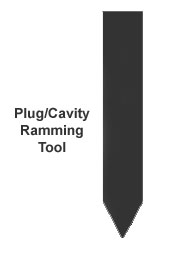 |
As you can see from the illustrations, the plug/cavity ramming tool is nothing more than a wooden or metal rod with the end ground down to a point, that slips easily into the cardboard tube. The best choice for making the tool is aluminum or steel. You're going to be pounding on this thing with a hammer, so one made of wood probably wouldn't last you all that long. You'll also need to make an identical ramming tool without a point on the end. This will be used for compacting the propellant into the tube. The step-by-step procedure follows.
PROCEDURE
Propellant: Most rocket propellants are suitable, particularly those that produce interesting sparks. The following composition works well, and several more may be found in the Collection of Pyrotechnic Compositions.
| CHEMICAL | PERCENT/PARTS | AMOUNT |
| Potassium nitrate | 0.680 | |
| Charcoal | 0.140 | |
| Sulfur | 0.090 | |
| Aluminum | 0.090 | |
Total | ||
Clay: The nozzle and end plug are formed from clay, much like as is done in the construction of rockets. As will be described shortly, the nozzle shape is different though. Bentonite, kaolin and ground kitty litter all work well.
Tools: A sleeve and rammer, such as used in the construction of rockets, are used for this project as well. Besides a flat-ended rammer, an unconventional rammer will also be needed. With some patience, it can be made by evenly filing down one end of a straight rod. Alternatively, you could drill a lengthwise hole of 5 mm diameter in the center of a flat ended dowel and fix a short length of 5 mm rod in that (much like as is done in the construction of a spindle).
CONSTRUCTION
Nozzle End
Buzz bombs differ from rockets in that the exhaust from the nozzle is projected sideways, exerting a torque. Clay is used to provide a more or less erosion resistant exhaust hole.
Propellant, End Plug, & Exhaust
Ram or press the propellant in small increments, each no more than will give a layer as thick as half the casings inner diameter to prevent wrinkling. The other end of the casing is filled with clay to form the end plug.
The exhaust hole is drilled through the side of the casing. This is a somewhat dangerous operation since it causes quite a lot of friction but as we do not need to drill a great length through the propellant and the propellant is quite insensitive, the risk can be considered acceptable (of course, a blast screen and proper protective clothing should still be used). Carefully drill a 1/8" hole through the side of the casing about 5/8" from the end. Drill halfway through the casing; the hole should reach just into the (now propellant filled) cavity in the clay plug, as illustrated in the images above.
Wings
Wings can be purchased from many different pyro supply companies. See ours here.
Assembly
Glue the wing to the casing with some hot glue. Take care to orientate the exhaust hole properly with respect to the wing. Insert a piece of fuse into the exhaust hole (2 1/2" of visco is adequate) and fix it in place with a drop of hot glue.
DANGERS
Place on the ground with the casing resting on the ground and the wing on top. Light fuse and get away. Keep well away from these items. They are somewhat unpredictable and may bounce around on the ground instead of climbing into the air. Like rockets, they may explode if the propellant is not compressed well. The end plug or nozzle may also be blown out which can be hazardous.